Wednesday, 2 November 2011

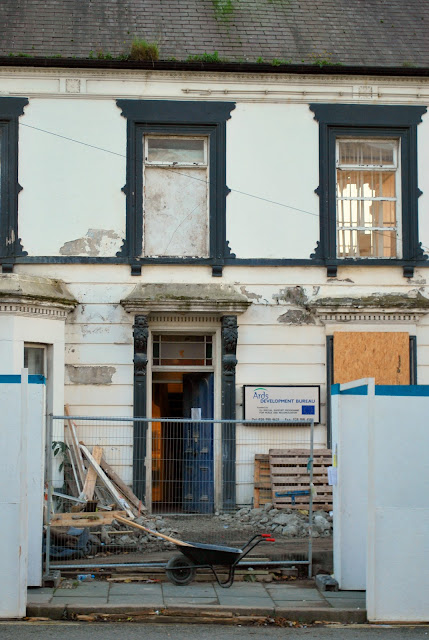
Colour me Tickled Pink!

Couldn't resist sharing this latest photograph that I happened upon while waiting for a bus on a gloomy Novemeber day!  I'm not sure if you can see clearly in this shot but the name place on the door reads: "Ards Development Bureau" and doesn't that just about some up the evil 'recession'!  Enjoy!
View more of my pics at http://www.elwoodprints.com/ or read my pain staking articles on photography tips and tricks at http://snaphappy.moonfruit.com/

Monday, 31 October 2011

15 Top Tips for Low Light & Night Photography

Photography has been a passion of mine for many years now and is growing in popularity and access thanks to the development of compact digital cameras available everywhere from your local petrol station or supermarket to specialised photography wholesalers.

One area of discontent for many a budding enthusiast is low light shots and outdoor night photography.  All of us have experienced the frustration and vexation of being moved by the seduction beauty of darkness and trying to capture those moments on camera only to upload the images to our hard drives and find heavily pixellated or out of focus offerings that belong in our recycle bins.


Here’s a few hints and tips that I’ve learn through blood sweat and tears over the years.

1. Get an idea in your head of what you'd like to shot and where.
2. I love playing with light and shadow and especially celestial beings on water so if you want to capture a sunset or rising moon check which direction you need to shot in, you may have to change location and it's also handy to check out the visibility periods e.g. I'm in county down Northern Ireland, tonight the sun sets at 20.49 and the moon rises at 20.09.
3. Normal safety precautions, flashlight, mobile, a seat is always good especially for prolonged exposures and arduous set ups.
4. Use a tripod - if your shutter speed is less that 1/60 you're likely to encounter camera shake. Also if it's windy you'll need a pretty sturdy tripod again to prevent the wind either blowing over your camera or just catching it and shifting it in the gusts.
5. Remote shutter release is very handy if this is possible for your equipment as I find even holding down the button can cause the camera to move.
6. Try to get a tripod with a spirit level or bring one along as often you can't see clearly what you're shooting through the lens and can wind up with weird horizons and lines.
7. Don't use a flash as flash modes are only really effective if your subject is up to 6feet away and they confuse the other settings on your camera especially if you're shooting in automatic mode.
8. The higher the ISO (film speed) the more light reactive it is which allows you to cut down on exposure time or f-stops however I've noticed on my digital camera that low speed ISO's e.g. 1200 or 3200 can leave you with very grainy shots as the higher the speed the smaller the pixelation (I think - that's how it works on film anyway!)
9. Light and shade - light metering - remember if you focus your camera on the setting sun or moon the camera assumes this to be the average light of the whole picture therefore the darker areas that need more exposure will be very dark in your photo. You may have to mess around with settings to find a suitable balance depending of course on what you want to shot and what light contrast you desire.
10. Bracketing your photos is a good idea - find your optimal settings and then take a shot on either side, one slighter lighter and one darker as it's hard to tell what works until you see the finished product.
11. If you can it may be easier to set your lens to manual focus as a lot of cameras have trouble picking up what to focus on in the dark.
12. Use mirror lock if possible as even the internal mechanics of cameras can cause vibrations.
13. Take a lot of pictures and try different settings until you learn what works.
14. If your camera has a histogram function it can help to show you what's under or over exposed.
15. Enjoy and share!!!


More Free Articles at http://snaphappy.moonfruit.com/


Thursday, 13 October 2011

Belfast Underground Graffiti

Another Photo walk in Belfast and this one is definitely getting blamed for the expensive bottle of Cough Mixture that I'm currently chugging down.  Seasons are certainly changing but that matters little underground where I took a little diversion down one of Belfast's pedestrain subways and snapped a few of the fab graffiti sketches down there.  I find the 'Emerald Isle' green car the most amusing! 

Again check out my other photos at http://www.elwoodprints.com/ and Photo Articles and Contests at http://snaphappy.moonfruit.com/


Monday, 10 October 2011

Belfast By Night

For new shots from a rather chilly stroll along the Lagan.  The 'art' captured is a replica of the Titanic and stands next to the boardwalk, behind the Odyssey and at the start of 'The Titanic Quarter', other buildings can be seem such as the Obel Tower with it's picture frame windows, the lighted dome of the Victoria Centre and of course the P&O ferry!  I tried out my new 'star' filter that night but found it overwhelming when there is so many points of light.  Anyway, I hope you enjoy these...

As usual, these can be bought on my website http://www.elwoodprints.com and please help promote my photographic community project - http://snaphappy.moonfruit.com


Tollymore Forest Park

Expanding and growing as a Photographer, or at least trying to, I decided to do some long daylight exposures and RAW file manipulation so nothing like a relaxing stroll in the beautiful, multi-hued forage of a forest with it's very own bubbling brook - well river (a few years ago during torrential rain the banks flooded and broke many of the ornate bridges!).  Of course living in Northern Ireland this didn't go quite to plan as it rained and blew a gale!  Unfortunately this meant that a lot of the photographs were unsalvagable due to motion blur from the rustling trees.  I also found that I had to buy a convertion programme to work on my raw files and that shooting in raw removed a lot of the colour saturation and contrast but this is after all a learning curve.  So without further ado feast your eyes on Tollymore set int he heart of the Mourne Mountains!


My official website is: http://www.elwoodprints.com were you can view many more examples of my work and order prints online.  I also write for and support: http://snaphappy.moonfruit.com a photographic community and contest site with many free articles and courses on photography.


Tuesday, 23 August 2011

Make the Most of Your Camera This Summer

How to get the best results from your camera this summer?

Summer is a time of candy floss and cloud gazing, lying on your back and soaking up the rays, exploring and rediscovering your favourite holiday spots and what your own beautiful country has to offer, barbeques and tinny music stereos.  It is a time when people smile more, when motivation is so much easier to come by, to get out of bed, go outside and greet the new day.  It’s uplifting to the mood and inspiring to the arts.  So how do you use this new found enthusiasm as a budding photographer? Here are some handy tips.

1.Summertime means brighter, sunnier days which is a blessing for photographers.  Now you can change your camera’s setting to shot at a max. ISO of 200.  Decreasing the ‘film speed’ means smaller pixels and more detailed and in focus shots.  On bright days you can now shot at fast exposures (set to min: 1/125) so that you don’t have to worry about camera shake outside and can explore the world of motion photography.  Being able to shot at shutter speeds of say 1/1000 means that you shutter opens and closes at one thousandths of a second so subjects that are moving fast can now be capturing without blur, for example, sports photography or taking pictures of a bird in flight or dog catching a Frisbee.  You can also set your f-stop (aperture opening) to a higher number which means a greater depth of field and more of your image in focus.  This is great for those spur of the moment action shots that normally would come out, out of focus or with the focus on the background instead of the foreground and ‘grainy’ so get out there and experiment with what you can capture.


2.Allow bright, sunny days definitely have the fell good factor there are still some things you need to consider as a photographer.  The best time of the day to shot is in the morning and early evening as when the sun is at its apex the light can be too strong and powerful and bleach out many a scene.  With bright sunshine remember that you now have to consider shadows, also direction – if you shot into the sun you will, at the very least, get sun spots (use your UV filter to help) and at worst get a huge, overexposed sunlight ball with everything else hazy and darkened.  By all means do shot into the sun but make sure that you’re taking your light metering readings from the subject that you want to highlight so that the exposure is correct for them. 

3.People shots looking smiley and happy are great but if the sun is behind you your subject has to squint into the light which makes for unattractive and uncomfortable poses.

4.With so much natural light available why not use that source by reflecting it onto your subject using reflective umbrellas or discs?  This helps you control how your subject is lit for the best finished results.  These products are available fairly cheaply now on eBay or Amazon.

5.Although holiday makers love to see clear, blue skies they are no advantageous for photographers.  For the best pictures you want detail in your capture and the distinct and shapely clouds of summer add beautiful definition and personality to a picture that can otherwise appear bland with just a bank of solid colour. 

6.Take advantage of the longer days to experiment with your sunset shots.  Check the time the sun sets and plan in advance an ideal location (in the west!) to act as the foreground of your image.  Sometimes the best shots are not of the amber, sinking halo, as metering your image to capture the colour of the sun, without overexposure, darkens everything else, but of the colours in the sky and the hues cast over other objects with beautifully diffused light and shadow.  I good tip is to ‘bracken’ your images as it’s very hard to tell if you have the right settings from a small view finder, so mess around until you have your camera set to the best exposure, aperture, ISO and then shift one of these factors down a point and take another photo and then up a point and examine the results at home.

7.The quality of your photographs, given the settings provided by the climate, will be far superior to other shots so, it’s a good idea to think about your favourite shots from the past and revisit these locations to get even better photographs now that the conditions are ideal.

8.Summer is also a great time to develop specific areas of your skill, for example, portraiture, weddings or social photography and stock photography.  There are certain activities that are seasonal so don’t miss the opportunity to take advantage of new and different subjects and styles.  In summer you can become more comfortable with shooting people and can learn what works for you in portraiture without having to risk spending a lot of money on studios and lighting kits, just to realise that this area doesn’t interest you.  Your studio is the great outdoors and your lighting is provided free of charge so develop your patter and professionalism, asking friends to pose for you and helping them feel at ease.  There is also a great demand from companies and businesses for travel photography or simply summer stock photography. 

Businesses are going to want attractive, positive and colourful images to represent them in magazines, brochures, blogs and websites so the majority of the images that they buy will be taken over the summer not only due to the content but the added quality that can be more easily achieved.

So this summer, stride outside of your comfort zone and rediscover your potential and avenues available as a photographer.  Carry your camera everywhere, make the most of the light and enjoy yourself as you try new subjects, compositions and even post editing effects.  Practice makes perfect after all and what better way to study than visiting new places and browsing for shots with the sun beating down and cheerful nature dancing and laughing all around you.

Sunday, 31 July 2011

Top Ten Wedding Photography Tips

Top Ten Wedding Photography Tips…


Wedding photography is fun and exciting, an adrenalin rush and don’t forget the free hoer d’ovres but it is also terrifying.  The happy couple are entrusting you to document and immortalise the biggest day of their lives and you only get one shot (ignore the pun)!  Don’t over sell yourself and know your limitations.  Practice at these events is one of the only ways to learn so you should have a dozen or so free shots under your belt to help your confidence, expertise and to avoid unexpected surprises.

Here are a few hints to help you get started:

1.)    One of your greatest selling points as a wedding photographer is your own dynamic personality and confidence.  Do not be afraid to be assertive, to polite interrupt conversations and to give orders.  By all means, try to remain invisible and skulk around like a paparazzi but you’ll get rubbish quality photographs with half cut heads, turned backs and bad lighting and composition.  Do take candid photographs as sometimes these can turn out wonderfully but NOT exclusively.  In the end of the day the guests will forgive your intrusions where they see the result and the bride and groom will want professional, posed photographs that they can live with for all the years to come.  Unfortunately he who shouts loudest sometimes laughs longest so show confidence and get the photos taken with minimal effort and time wastage.  Also don’t miss those one-offs, for example ~ make an announcement (or often ask the mother of the bride to boss folk around for you – they like to feel useful) tell the guests not to throw confetti until you have the shot lined up, the bride and groom, not to cut the cask without you and often photographers ask guests not to take photographs during the signing of the registration or other key moments ~ simply say that you’d like to get the official photographs done first and would everyone mind please waiting and you will give them 5 minutes at the end to flash away to their heart’s content.


2.)    Many photographers are now asking the bridal couple to meet with them before the wedding day to take some ‘engagement’ shots (or test shots so that you can work out the best filters, functions, light balance etc), these are nice to have and helps you firstly be more prepared and secondly build more of a relationship with the couple so that they feel more comfortable around you and less shy.


3.)    If you are doing the photo shot in a location you haven’t visited call ahead to inquire about photographic rules (some churches or civil offices will allow photography during the service, for example, and some won’t) and visit, in person, the gardens or terraces etc to test out the best areas for backgrounds, the lighting and all those little things that can make or break a photo.


4.)    Check the weather forecast so you’re prepared for light balance and conditions.

5.)    Sometimes the addition of props works very well.  For example, I shot a wedding in the snow at Christmas and brought along a clear, black rimmed umbrella that added the perfect touch to the scene.  You may also want to bring horseshoes, flowers, ring cushion (though they will probably have all these) but depending on the location, style and even theme you can be creative, I’ve even seen professional wedding shots using a gimmicked ball and chain or holding a ‘Just Married’ sign.

6.)    Make a list of poses and moments not to miss.  You want a complete start to finish documentation, from (if they want) the early morning preparations ~ these shots can be great because everyone is exciting but more casual, to the wedding car, tank or horse, get detail of the dress including close-up shots and the back view, make sure you have all the important family members represented, exchanging of the rings, walking down the aisle, throwing of the bouquet, confetti, champagne etc

7.)    Levels are good, they make things interesting.  One way to get everyone looking at you is for you to be at a higher vantage point (though watch for sun position).  Saying ‘cheese’ sounds ridiculous but at least shouting something like this tells everyone to be ready and minimised queer looks and shut eyes.

8.)    White dresses make colour balance difficult, make sure you’re using the facial tones for focus and watch out for over exposing and bleaching out detail or the opposite and having a perfect dress but everyone looking like they’re wearing body paint!


9.)    Watch your depth of field ~ you may need a smaller f-stop to take rows of crowds or even if the groom is standing behind the bride, take close-ups of happy faces, tiaras, hair detail but make sure you don’t chop off the dress in full length shots.

10.)                        Have fun with it, you don’t have to be conventional.  Do a Google search for possible ideas and think about the characters and personalities your shooting; don’t think of them as objects.  Try out different angles and heights and some comedy shots will keep the crowd entertained and interested.